Jan 26, 2024
A Guide to Capacity and Travel
You worked hard to buy the boat of your dreams. When you finally get the time to enjoy it, you don’t want to waste time getting it into the water. That is why so many waterfront owners choose to purchase boat lifts to store their vessel on site. Image the convenience of being in the water in minutes, while also keeping your boat safe and clean.
In order to achieve this, it’s important you choose the right boat lift to ensure the safety and longevity of your vessel. This guide will explore the key factors to consider when selecting a boat lift.
Understanding Capacity
Dry Weight vs. Operating Weight:
The first question you’ll need to answer when looking for a boat lift is, “What is the weight of your boat?” Your first thought will be to check your boats specifications, but there are many factors that contribute to your boats actual weight that are not listed in your boats specifications. The dry weight listed for boats often excludes outboard motors, fuel, fluids, gear, and accessories. You will need to consider the combined weight of these additional items when choosing lift capacity.
- Adding a 20% buffer to the total weight provides a safe margin for unforeseen variations.
- Overestimating capacity is wise if you plan to upgrade to a heavier boat in the future.
People and Cargo:
We know your time is limited and you want to spend as little time getting onto the water as possible. Storing your gear right on the boat is one of the biggest advantages of having your boat stored on site. You may not realize how much additional weight even the most typical items can add to your vessel. Now add a passenger or two. As you board your boat, you want to ensure easy access, especially for those who might not get around as easily anymore. To safely do this, you want to make sure you have taken these extra pounds into account.
- As per manufactures, boat lifts are not meant to carry people while in operation. Be sure to load and unload passengers with minimal time spent on the lift.
- As per manufactures, pontoon boats are not suitable as recreational decks while on the lift. With the proper increase in capacity, you could feel safer enjoying your boat even when it’s docked.
- Overloading the lift can cause serious injuries, and damage to both the boat and the lift itself.
Understanding Travel
The travel of a boat lift refers to the distance from its lowest position to its highest position. When the lift is in its highest position, you want to make sure the keel of your boat is high enough out of the water to avoid wave action. At its lowest position, you want to make sure you have enough water depth to freely float your boat off the lift.
Wave Action:
- Areas with strong waves necessitate a lift that elevates your boat sufficiently.
- Some lifts offer extended lifting ranges for optimal clearance in challenging conditions.
- Specific brands allow you to move small watercrafts away from the water entirely.
Water Depth:
- Knowing your water depth is crucial for selecting the appropriate lift type.
- Every body of water has daily and seasonal fluctuations, make sure you know the highs and the lows of your particular body of water.
- Shallow water may require a lift specifically designed for low water conditions.
- The lift’s minimum depth requirement needs to accommodate the draft of your boat.
Popular Boat Lift Options
Everyone’s needs are unique to their slice of paradise and the equipment they use. That’s why we have partnered with the industries top boat lift manufactures, so that we can provide a boat lift solution that fits your needs.

Offers cable and hydraulic lifts with capacities ranging from 1,200 lb to 12,500 lb.
Cable lifts have a 5’6” lifting range and require 12″ of water depth plus the boat’s draft.
Hydraulic lifts offer up to 5’ of lifting range and require 18″ of water depth plus the boat’s draft.

Offers hydraulic lifts with capacities ranging from 2,000 lb to 30,000 lb.
Hydraulic lifts have a maximum 6’6” of lifting range, ideal for areas with strong waves.
Lifts can be adapted for extremely low water levels with their shallow water kit.

PWS offers Swinger lifts and Elevator lifts with capacities ranging from 1,500 lb to 16,000 lb.
Swinger lifts have a travel range of 8’6” and Elevator lifts have a customizable travel range.
Swinger lifts have the ability to rotate your craft 180° to move it away from the water completely.
Elevator lifts can operate at a 45° angle, making them ideal for overcoming obstacles.
Professional Assistance
PWS: Your Trusted Boat Lift Partner
Choosing the right boat lift can be complex, seeking professional assistance is recommended. PWS offers a comprehensive selection of ShoreMaster, SunStream and Davit Master boat lifts to meet your specific needs. Our experienced team can help you choose the right lift for your boat, water depth, and wave conditions.
Contact us today at (920) 493-4404 for a free consultation.
Additional Resources:
Nov 10, 2020
How to Remove Mold/Mildew From Vinyl
Despite your best efforts, you may notice mold/mildew forming on your vinyl seats in Fall. For a boat to look its best, the seats require regular cleaning and maintenance.
With any boat, you have opportunities to enjoy the waters of Wisconsin. At the same time, those opportunities come with constant exposure to moisture and the continuous UV rays.
Mold/mildew
Seats are particularly susceptible to the risk of mildew and mold. With proper maintenance in Fall, your boat will be better prepared for Spring startup.
In Fall, if you notice dirt and mildew forming, it’s time to take action.
With the right tools and supplies, you can keep your seats free of mildew.
What do You Need?
Most boat seats are made with vinyl since this material can stand up to wet conditions of regular use on boats.
However, vinyl is susceptible to mildew with the constant exposure moisture. You need to find the right materials to get started. We recommend:
- Bleach-free mold and mildew stain remover
- A soft brush
- Microfiber cloths
- Marine and UV protectant spray
- Magic Eraser sponges
None of these supplies are expensive so that you can handle this cleaning job without much effort on your part.
Caution – Bleach and Vinyl don’t mix
Bleach is an excellent tool for cleaning up all sorts of messes. Mold/mildew are included in those messes. Nonetheless, keep bleach (and any cleaners that use it) away from your boat seats.
Why?
Bleach, when used on vinyl, takes out the oils in the material. Those oils are essential for the resistance to water and the life of those same materials.
Bleach can also impact the stitching that holds your seats together. It causes the seam to degrade and eventually come apart. Vinyl doesn’t last forever, but why make the end of life happen sooner. Save some money by cleaning it properly.
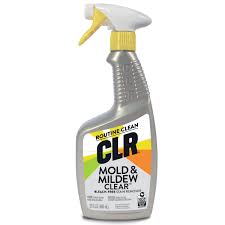
CLR for mold/mildew removal
Check any mold and mildew stain remover to ensure these products do not include bleach as one of the ingredients. For a safe pick, try CLR mold remover. Now that you have the right cleaner take the extra step of cleaning a small area not readily seen to make sure you didn’t miss anything in the ingredients list.
Removing Mold/Mildew Stains from Seats
Follows these steps to remove mildew from your boat seats effectively.
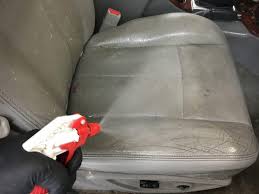
Spray the Mold cleaner on the Seats
Start by spraying your mold remover on the seats. Also, spray into the gaps and seams, so there is no hidden damage from mold or mildew. Mold likes to form in those areas.
Next, let the cleaner sit for some time. Practice patience like you are telling the kids all the time.
How long should you wait?
Wait at least 5- 10 minutes to allow the spray to penetrate the material.
Really stubborn stains?
Soak it longer or repeat the process. Read the directions for the best results. (There I go again – reading the directions just like my wife tells me to.) With time, the cleaner can penetrate further and do a better job of breaking down the mold and mildew.
Next, Start Scrubbing
Now, after you have read the directions and patiently waited for the removal to work, it’s time to scrub. Always use a soft brush so that you don’t scratch your seats and cause damage.
Do not use a lot of force to scrub the vinyl, or you’ll cause damage. Using the proper mold and mildew cleaner means you will not have to use too much elbow grease. You’ll still have clean seats.
The proper brush helps get the mold off your vinyl, but you can still expect to see some leftover debris.
Remember the nooks and crannies too.
Now, Wipe Away the Debris
With the problem areas scrubbed, you want to wipe off any mold debris still holding on. Using any type of cloth is fine, but a microfiber cloth is recommended. Microfibers are gentle and less likely to tear your vinyl.
Wipe in a circular motion – it’s the most effective way to do it. Reach down into those cracks and crevices too.
Be prepared to use several cloths. Why use a dirty cloth when you are attempting to clean something?
Repeat as Necessary
Massive mildew build-up may require additional applications to get the surfaces clean. Really stubborn stains may require a second application or more time to allow the cleaner to do its thing.
Have you tried multiple times to get rid of the mildew, and it’s still there, just reduced in size? It’s now time to bring out your last line of defense.
Use Magic Erasers on Stubborn Stains
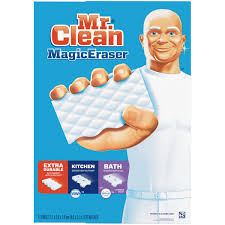
Magic Eraser to remove mold/mildew
Magic erasers come with special cleaners inside that are ready to tackle messes that stick. A bonus, you don’t have to scrub hard – let the solutions do the work for you.
They are excellent for hard to reach or stubborn stains. Get the “eraser” wet and start wiping.
A couple of passes with the “eraser” and you will see the results. Be gentle and let the cleaners in the “eraser” do the job. Scrubbing too hard may damage your vinyl.
You could start with the magic erasers, but you don’t need all that power for most stains.
The last step – Use a Vinyl Protector
By applying a vinyl protector, you are doing preventative maintenance. Vinyl protectors protect your vinyl from UV rays and make your seats look great. Additionally, the protector prevents future mold and mildew from forming.
A word of warning- allow the vinyl to dry completely before applying the protectors.
Prevent future mold and mildew
- Use a vinyl protector ( after they are thoroughly clean)
- Wipe down your seats after use. Remove all sweat, moisture, and suntan lotions. Mold and mildew both require moisture to form, so wipe down those seats.*
- Don’t let moisture form during winter storage. Check-in on your boat occasionally to help you catch a mess before it becomes a problem.
- Purchase mildew-resistant seat material. While not 100% foolproof, mildew-resistant seat material can save you time and money in the long run. Why not reduce your chances of getting mold in the first place?
Keeping your seats clean will pay off when selling your boat, as mold and mildew can decrease your boat value.
*See this video for more information on mold and mildew.
For another option see this video using another product.
Tell Your Friends & Family
Have friends or neighbors you believe should see this article? Email a link to this article – and Thank you!
You can visit Pier & Waterfront Solutions on Facebook also.
Don’t Forget – PWS is the expert when you have a waterfront problem!
Where is Pier & Waterfront Solutions?
Located at 7325 St. Hwy 57, we are about 3 miles south of Sturgeon Bay, and 1 mile past the intersection of Cty MM (heading north). Look for the intersection of Idlewild Road and Hwy 57.