Feb 8, 2019
Dear Dave,
I want to take the time to thank you for the fine job your crew did in taking out installing my pier.
They were very polite, considerate, and exceeded my expectations.
Please extend my thanks. You have a GREAT TEAM in them.
They will make you very successful.
John K. Door County
Jan 29, 2019
WHICH DOCK CONFIGURATION SHOULD I CHOOSE?
The dock configuration is the next thing to consider when figuring your total dock cost. Your decision should be made after reading part one of this series (What does a Dock cost?). After reading that, you probably have an idea of the frame style you would like to use.
Next, you should read part 2 – What type of decking is available? Select the decking that caught your eye. Part three discusses the dock configurations you may want to use. We also include some of the accessories you’ll want to consider.
Let’s start the process
So you’ve measured water depths, surveyed the neighbor’s dock, and determined how far out you need to go. Maybe not! Don’t want to walk in the cold springtime water? Remember, we confirm the water depth for you as part of our site surveys.
At this point, you may be looking at a straight dock – (boring)!
What you add from here on transforms your dock from a strictly functional piece of equipment to a relaxing area, and so much more. The configuration you choose in the end should reflect the way you want to use the dock.
Everyone has different ways to use their dock. Some people want to be able to fish off the end of the pier. Maybe even have a bench or seating available. Others want access to their boat. Still, others will use their dock as a primary entertaining and relaxing area. These are all great reasons.
ShoreMaster docks are versatile so you can change your dock layout from season-to-season. Remember, the Infinity dock system allows you to do this easily. See also-https://wisconsinpws.com/infinity-track-system/
We have included configurations as well as actual photos of our docks in the photo array below. Get started on the layout that fits your needs. Then give Pier & Waterfront Solutions a call.

Common Dock Configurations

More Configurations
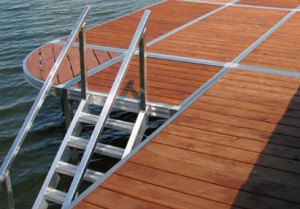
RS4 dock with Dock Steps
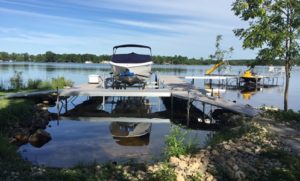
ShoreMaster Dock Configuration
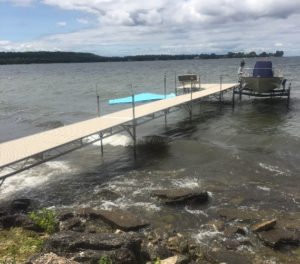
Dock Configurations 2
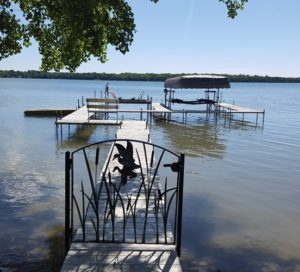
Dock Configuration 3
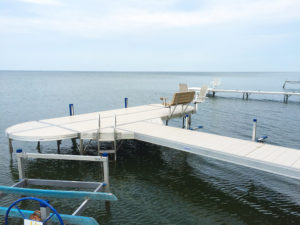
Dock Configuration 4
OR
Design your dock configuration on the ShoreMaster Website
ShoreMaster has a simple dock-builder available online. Its very simple to use. (drag and drop) It handles MOST configurations. Are you having difficulty? We can do it for you. In most cases, we give you a rendition (sometimes hand-drawn), so you can be sure the layout is what you envisioned.
What will I be able to do on a dock?
Fishing – Consider an extra-wide dock section at the end to give you more room to cast and lay out your fishing equipment. Install a bench for more comfort.
Docks are an excellent place for kids to learn from Grandpa. They can relax on the dock and exchange fishing stories and learn a little bit about life.
Try to extend the dock far enough into the water, so you’re next to a weed bed. A dock helps lure fish. Fish like to congregate and seek out cover and protection.
Sports – How about Kayak or paddleboard racks? Why keep carrying your equipment up to the house? Keep it handy and ready for use.
Entertaining – If you regularly party on your dock, you’ll want a dock that is wide enough to accommodate your guests. It must offer plenty of space for moving around. For extra space around a serving table or a bench, consider an additional 4-foot wide dock section. We can add it on to the standard 4-foot wide sections. Consider an inside corner section. It’s great for adding space – and peace of mind. A 90-degree corner can seem precarious.
For more pizazz, ShoreMaster offers a curved design on their truss and rail dock systems. Consider adding a curve to your dock. Go around obstacles like trees and rocks and make a unique dock at the same time. It definitely won’t look like your neighbors.
A rounded dock near the end, at the shoreline or even at the midpoint adds a unique design that only you have. The style is distinctly yours.
Patios
Ninety- five percent of the time the dock layout will include a “patio” area. The patio area requires a section of dock placed parallel or perpendicular to the main dock. Adding one patio dock essentially creates an 8 ft x 8 ft activity area over the water.
What if you add another patio area to the side to make a 12 ft wide x 8 ft long area? This additional “patio” section could be placed alongside the first section OR on the opposite side of the dock. The layout also helps protect your dock in a storm by making it broader and more stable. However, the REAL advantage of these layouts is that you have more working or entertaining area available.
Put a bench or patio set on the patio area to stay dry. Use it to get away from people entering or exiting the water – if they let you.
By the way, who said the patio section of a dock has to be at the far end of the pier? Would it be more functional at the midpoint or even at the shore end?
Watercraft Access:
- Do you launch a boat or jet skis? These functions may need different layouts depending on the depth of water and the draft of your boat or jet ski. They reflect what the owner needs for launching and storing the watercraft.
- A typical layout would likely be the finger dock. The finger dock consists of lengths of pier placed perpendicular to the side of the main dock. The arrangement creates a place for your jet skis or boat.
- The use of a “T,” or “Y” shape can add a distinctive look to your dock. After all, your pier is the focal point of your shoreline. Every visitor will want to go out on your dock.
What accessories will you need for your dock configuration?
- Seating– In the form of furniture sets, chairs or benches.
- Utilities– Water and electricity run under the dock frame.
- Lighting– A.C. power is available, but the preferred method is solar powered lighting. They are typically placed in recessed “dots” in the decking.
- Ladders– On the bay of Green Bay most docks are set high out of the water to protect them from waves. A pivoting ladder will get you out of, or into, the water safely.
- Railing- A railing makes it safe for people having difficulty getting around or those who are unsteady on their feet to access your dock.
- Storage boxes– Skiers, kayakers and paddleboard enthusiasts may want to invest in a dock box to store their equipment. (life jackets, paddles, and beach towels). The storage boxes come in many shapes and sizes – (square, rectangular and triangular to name a few).
To summarize this series – What does a dock cost? It depends!
Missed a part of this series?
Publication dates:
Part 1 – What does a Dock cost?
2 – What type of decking is available?
3 – Which dock configuration should I choose?
Need Help Planning a Dock Configuration For Your Home or Cottage?
Do you have a friend that may be interested in this information? Please share a link to this page with them.
PWS is located at 7325 St. Hwy 57. That’s 1 mile North of County MM (Hwy 42) and 3 miles South of Sturgeon Bay at the Idlewild Road intersection.
Our staff is here year-round to assist you.
Jan 15, 2019
WHAT DOES A DOCK COST?
That’s the question our sales team is asked all the time. We have the answer to this question – “It depends.”
Seriously though, that’s the truth – because it depends on so many factors. Your answer to these simple questions will help us to determine the cost of your pier:
- Where will it be located?
- The type of lake bottom you have?
- The size of the waves you encounter?
But, not to worry, our sales team knows the Door County peninsula. Our sales team lives and work here. We know what to expect and we will guide you through the process. We have customers on virtually every shoreline on the Door County peninsula.
One of the first questions we ask is “where will it be installed?” This question starts the process by narrowing down the frame construction you need.
You may need a floating dock because the bottom is muddy and the area has no waves. Others need a massive, heavy frame to help hold it in place during a storm.
NEED A DOCK AND NEW TO THE AREA?
Have no idea what to expect? Our list of customers is so extensive, we can look up other docks that we sold in your area. Site visits are very important and we offer them FREE.
Door County is a unique area. There are areas where a wave of 5 inches is considered a big wave. Then, there are areas where 5-foot waves are the norm.
A floating dock will not work in areas with large waves. A stationary or wheel-in dock will not work in a deep, muddy situation. Given these examples, it makes sense that one type of dock may not work in both areas. We have to ask questions to narrow our recommendations down.
To determine your cost we have to look at the three main components: Frame, Decking, and size of your structure.
HOW MANY FRAME CHOICES ARE THERE?
Pier & Waterfront Solutions (PWS) offers EIGHT frame styles. That’s more choices than anyone else.
Frame choices include:
Aluminum
TS9 (Stationary or Wheel in)
RS7 (Stationary or wheel in)
RS4 (Stationary with Curved frames optional)
FTS9 (Floating)
Poly
Polydock (Floating)
As a one-stop dealer, you’ll find a solution for all your dock & boat lift needs here.
FRAME EXAMPLES
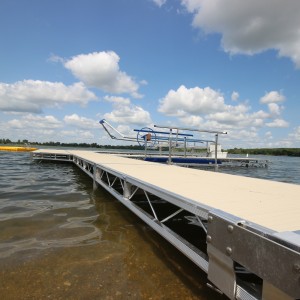
ShoreMaster TS9 Dock
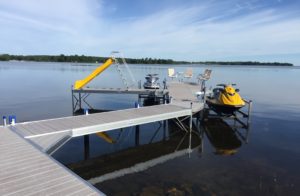
ShoreMaster RS7 and RS4 Curved Dock
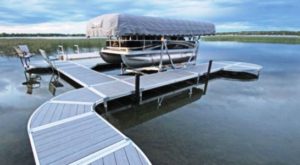
RS4 dock & RS4 Curved dock by ShoreMaster
Polydock by ShoreMaster
Create your perfect waterfront experience with the most user-friendly pier on the Door County peninsula. ShoreMaster aluminum dock systems provide exceptional stability and versatile configuration options.
Infinity TS9 Dock Frame
Available in Standing or Wheel-in Configurations
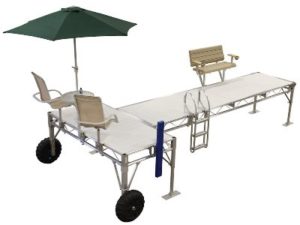
ShoreMaster TS9 Wheel-in Dock
The 9” frame is incredibly sturdy for its weight. It’s great for the rough waters of Green Bay. The truss frame is the most popular dock construction on the bay of Green Bay.
Infinity RS7
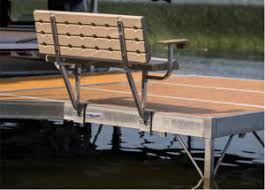
ShoreMaster RS7 Standing Dock
Standing or Wheel-in configurations available
RS7 frames are one of the most stable and attractive pier systems on the market.
The 7” frame can be configured to fit nearly any layout you desire. Perfect for a rocky to soft lake bottoms with shallow to moderate water depths.
Infinity RS4
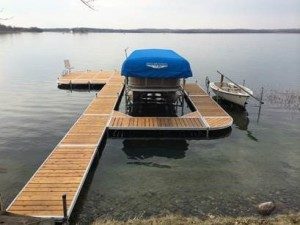
ShoreMaster RS4 dock with Curved Dock Sections
The ShoreMaster Infinity RS4 is highly configurable and durable. RS4 frames are ideally suited for a firm to slightly soft lake bottoms. The 4” frame easily handles shallow to moderate water depths and waves.
Don’t forget – these sections can be combined with the RS4 Curved units for even more configurations.
Floating FTS9
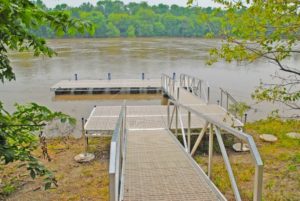
FTS9 Floating Dock
ShoreMasters Floating FTS9 is the perfect choice for, muddy, fluctuating, deep water conditions.
No more having to adjust the pier height during low or high water situations. A stable, floating dock system, it uses premium dock flotation and with a sturdy truss frame. It looks great and requires minimal maintenance
Polydock
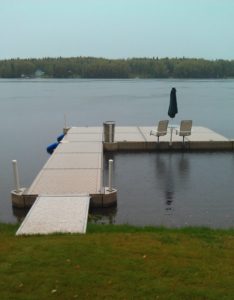
ShoreMaster Polydock
Floating Dock Sections
Polydock products help you get out and enjoy your time on the water. It is a floating, low-maintenance system that is functional as well as attractive. Accessories like the Shore Port personal watercraft lifts (https://www.shoremaster.com/lifts/lift-models/shoreport/) and a complete line of accessories are available.
You’ll be enjoying your new Polydock system in no time at all.
As you can see there are MANY options available for your particular needs. Follow up with Part 2 to see your choices in decking.
Looking for more detailed information on dock frames follow this link: https://wisconsinpws.com/piers-docks/
Publication dates:
Part 1 – What does a Dock cost?
2 – What type of decking is available?
3 – Which dock configuration should I choose?
Need Help Planning a Pier System For Your Home or Cottage?
Do you have a friend that may be interested in this information? Please share a link to this page with them.
PWS is located at 7325 St. Hwy 57. That’s 1 mile North of County MM (Hwy 42) and 3 miles South of Sturgeon Bay at the Idlewild Road intersection.
Our staff is here year-round to assist you.
Jan 8, 2019
DOES A DOCK NEED AN ANCHOR?

Do I REALLY need to use a dock anchor or auger? First-time dock owners in Door County ask this question all the time. Their concerns are valid – no one wants the extra work or cost if it isn’t needed.
First, let me say that on most inland lakes on the Door County peninsula it is not necessary to install an auger or anchor. Except for Lake Winnebago, the inland lakes generally are not deep enough or wide enough to be of concern. Without an open expanse, the waves typically do not present a problem. That statement is contingent on you having the dock set at the proper height.
WHAT SHOULD FIRST-TIME DOCK OWNERS LOOK FOR?
For new dock owners, we recommend you look around your area. How high are the docks set? Experience is a great teacher.
If a majority of the piers are set “low” to the water, it’s probably safe for you to do the same.
Here’s a great way to meet your neighbors. Most people want to help. Don’t be surprised if the name – Pier & Waterfront Solutions comes up in the conversation as the place to go.
In general, if the summer storms reach a height of 36 inches, then the bottom of the frame should be at least 38-42 inches above the water. This height allows the vast majority of the waves in a storm to pass under the dock frames.
WHO NEEDS TO ANCHOR A DOCK?
Summer thunderstorms kick up 4-6 waves on the bay of Green Bay with little warning. It’s no wonder that people use augers to anchor their docks.
One method to secure your dock is to pound pipe legs into the gravel or sand. This takes a toll on your back (or your friend’s back if you were smart enough to recruit help).
Not the best idea. Besides, you have to figure out a way to get the pipes out in the fall. You can’t pound UP!
This method is ineffective in most cases. A wave pounding against the bottom of the decking will lift the dock straight up. Once the leg is pulled out, the dock usually will twist or roll-over due to the continuous pounding from the waves.
WHAT OTHER OPTIONS DO I HAVE?
The recommended option is to use augers in critical locations. One way to do this: the husband holds the dock frame up (he’s strong you know). Meanwhile, his wife uses a pipe wrench to screw the auger pipes into the bottom. This is hardly a recipe for marital harmony either. We DO NOT recommend this procedure.

auger pipe
On a calm day, the only part of the pier that is in the water is the support pipes (legs). The legs have a low surface area in comparison to the entire dock. Waves easily pass around the legs with little resistance.
Minimal resistance is the key to securing your dock.
WHAT TYPE OF DECKING YOU USE IS IMPORTANT?
Most decking has an almost solid surface. As a result, there is no place for the water to relieve the pressure when it hits the dock. In a vast majority of decking, there are only a few 1/2″ openings in the decking. Waves hitting the underside of your dock have no way to reduce the pressure on the pier. This will cause an upward movement.
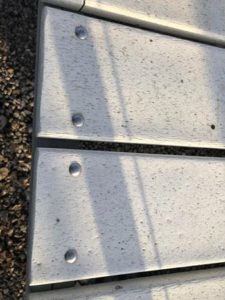
Typical Plastic decking
What’s the best decking with the least resistance to waves?
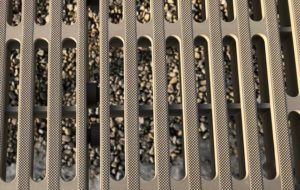
Open decking
Flow Through decking provides the least resistance to the waves by reducing the surface area by 42%
Our advice is to assess the worst case scenario for wave conditions in your area. Then set your dock height higher based on those conditions.
Setting the dock height too low on the bay is a bad idea. You do so at your own risk.
Customers with steel framed docks and board decking have found their docks flipped over in storms. The dock usually sinks. or in some cases, get washed down the shoreline. The parts of some of these piers have never been located.
Others were damaged because they ran out of pipe length and did not want to replace the pipes with longer ones. With the higher water levels the past few years, pipes that are too short are getting common.
In some situations, even though the dock height is set correctly, a neighbors boat or other floating debris will hit your dock. You can’t prevent every situation.
WHAT ABOUT BEDROCK?
There are many places where dock augers do not work due to the limestone bedrock in Door County. There are three ways to handle this.
The first is to use angled leg pockets. The legs are angled out from the dock similar to spreading your legs to gain stability. This helps stabilize the dock more than standard vertical legs. However, this is no guarantee that the storms will not flip your dock. It does help though.
ANOTHER WAY
The second way to anchor a dock involves drilling in rock anchors. Once installed a chain is attached between the dock and the anchor. The problem is – how to locate the anchors after the ice goes out in Spring. In some cases, the ice and boulders that move in the Spring will destroy the anchors.
A final option involves using a large, heavy mass in the water to secure the dock. This serves as a dock anchor during a storm. Depending on the depth of the water this may have to be removed from the water each year. The ice may move it away if the dock anchor gets trapped in it. A submerged weight may not be the easiest way to secure a dock.
In summary, after everything is said and done, the simplest method is to keep the dock set higher than the waves.
Need Help Planning a Dock System For Your Home or Cottage?
Do you have a friend that may be interested in this information? Please share a link to this page with them.
PWS is located at 7325 St. Hwy 57. That’s 1 mile North of County MM (Hwy 42) and 3 miles South of Sturgeon Bay at the Idlewild Road intersection.
Our staff is here year-round to assist you.
Aug 28, 2018
ESD: What is it? Part 1 of 2
ESD, also known as Electric Shock Drowning, is a form of drowning caused by an electric current in the water. Where does the electric current originate? It could be your boat, a malfunctioning charger or lighting system. More on this in Part 2 of this series.
I have a fiberglass boat hull – that should protect swimmers – Right??
Yes, but you also have a motor with a metal prop in the water. As a result, this exposes people in the area of the boat to an electrical shock. The shock is greater as they get closer to the source of the problem.
Why is ESD even more dangerous in freshwater?
In freshwater, electrical current passes through the body paralyzing the body muscles. The strongest, most experienced swimmer in the world will not be able to swim through the current field if this happens.
Is there a warning of ESD?
Yes, there is:
- The victim will feel tingling, numbness, pain, and paralysis. That is the first sign of a problem. The closer they get to the source of the current the stronger the sensations will be – and the more paralyzed they will become.
- Initially, the victim will be able to shout, but if they unknowingly try to swim towards the electrical source, this ability will cease as they become paralyzed.
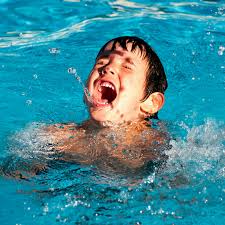
Still able to communicate
- The ability to “shout” more than once is critical. It is the difference between an ESD, an electrocution victim, and a drowning victim. An electrocution victim may not be able to shout at all. A drowning victim can only shout once or twice before his/her lungs fill with water.
- Typically, if the victim of ESD is not close to the source, he can shout and tell you what is happening. A drowning victim cannot yell as their lungs fill with water.
- Many times the ESD victim looks distressed and not as playful as usual. The muscles will no longer function as normal.
- The situation may turn into drowning once the victim begins to get water in their lungs.
How about Electrocution
- A possible victim will be able to scream, usually only once. The victim’s muscles will cease to function almost immediately.
- There will be a sudden cessation of all activity
- The victim usually rolls on their back with their face out of the water and is not responding if wearing flotation.
- If not wearing flotation, they will likely roll onto their face.

A swimmer in distress
Drowning
- The victim cannot speak or shout
• Reflexive “ladder climbing” with their arms even for an experienced swimmer.
• Looks “playful.”
• Lasts ~60 seconds with an adult and as little as 20 seconds with a child
• Slips below surface
What to do if you suspect an ESD situation
- Keep everyone out of the water – and if they are already in the water – DO NOT allow them to swim back to the dock unless the sensation gets stronger while swimming away from the dock or boat. Remember, the source may be a nearby dock, pump or boat.
- Try to get others in the area to swim away from your dock at least 100 yards and then go to the shore. The electrical current is stronger nearest the source and dissipates as you get away from it.
- Resist the natural impulse to jump into the water to help. You will become a victim yourself. Do NOT jump into the water. Use the Reach, Throw, Row, DON’T GO technique below.
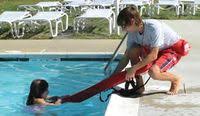
The safest way to help someone in distress
- Protect yourself by using an oar, a float or other non-conducting material to pull the swimmer to safety once the electrical source is shut off See the caption to the right.
- Immediately disconnect all power.
- Take the victim to the hospital to make sure there are no lingering effects that could be dangerous.
In General

Performing CPR if needed
- ESD victims are good candidates for successful Cardiopulmonary Resuscitation (CPR).
- Learn to perform CPR and maintain your training.
- To retrieve a person in the water, reach, throw, and row, but don’t go.
- Make sure your children understand the importance of not swimming anywhere there could be electricity. Don’t let them roughhouse on docks. Tell them what to do if they feel a tingling or shock in the water (see below).
I want to test for current myself. Can I do it?
Yes, with my digital voltmeter, put the negative lead to a ground, drop the positive lead into the water, if the needle moves, even slightly – you may have AC Voltage in the water. Having an electrician do the testing is the best way
- Have your boat tested once a year to see if it is leaking electricity, or buy a clamp meter and test it yourself. If you find any problems, have your boat inspected by a qualified electrician.
- Have a qualified ABYC electrician install an ELCI on your boat (refer them to the ABYC E-11 Standard) or use an ELCI in the shore power cord. As an alternative, install an isolation transformer on the boat.
- Test the GFCI/ELCI at least once a month or per the manufacturer’s specifications.
- DO NOT do your own 120-volt AC electrical work on a boat or hire an electrician who is not familiar with ABYC standards to do it. Many of the problems that lead to electrical faults result from the differences between shore and boat electrical systems and standards.
- NEVER dive from your boat to work on underwater fittings when it is plugged into shore power.
- DO NOT use common household extension cords for providing shore power to your boat. Use, and encourage other boaters to use shore power cords built to UL standards. Make sure the connections DO NOT touch the water.
If You Have A Private Dock
- NEVER swim within 100 yards of ANY dock using electrical power!
- If you have not electrified your dock or put an AC system on your boat, weigh the risks carefully before doing so.
- Need electricity on your dock – hire a licensed electrician and make sure the wiring meets the requirements in NFPA 303 and NEC 555. If your dock is already wired, hire an electrician to check that it was done properly. Docks are exposed to the elements, their electrical systems should be inspected at least once a year.
- If you normally run a power cord from your house or garage to charge your batteries, make sure the outlet has a GFCI and include an ELCI somewhere in the shore power cord. See part 2 of this series.
- NEVER swim off your dock without shutting down all shore power to the boat and the dock.
- Even if you adhere to all of these rules, nearby docks can still present a shock hazard. Educate your neighbors and work together with them to make the waterfront safe.
What if…
Someone you were with fell out of a boat without their life jacket – Would you know what to do?
- REACH: Hold on to the dock or your boat and reach your hand, a boat oar, a fishing pole, or whatever you have nearby, to the person. Many times these people have a fear of drowning and they will pull you under. Do not touch metal yourself.
- THROW: If you can’t reach far enough, toss things that float for the person to grab.
- ROW: If you’re in a boat, use the oars to move the boat closer to the person in the water, or call out to a nearby boat for help. Don’t use the boat’s motor close to a person in the water; they could be injured by the propeller
- DON’T GO: Don’t go into the water You will become a victim yourself. Call out for help. Never use a metal ladder or stairs to enter the water when there is an electrical problem
Be careful reaching from the boat or dock – If you are touching metal, you may be a path to ground yourself.
In part two of this series, we will explain more about the GFCI and ELCI.
Where is PWS?
PWS is located in the center of Door County at 7325 St Hwy 57. It is located 1 mile North of County MM (Hwy 42) and South of Sturgeon Bay. Look for the intersection of Idlewild Road.
Want us to address a dock or boat lift topic for you? Feel free to give us a call.
Call Jerry at 920-493-4404 or Email Jerry@wisconsinpws.com for more information.


