Sep 4, 2018
Electrical Shock Drowning ESD – Part 2
Electrical Shock Drowning or ESD was discussed in Part one of this series. Part 2 will get into more detail about this infrequent but deadly situation.
There are two potential failures in a boat’s electrical system that put people on or around the boat at risk. In a properly functioning system, the same amount of AC flows in the hot and neutral wires.
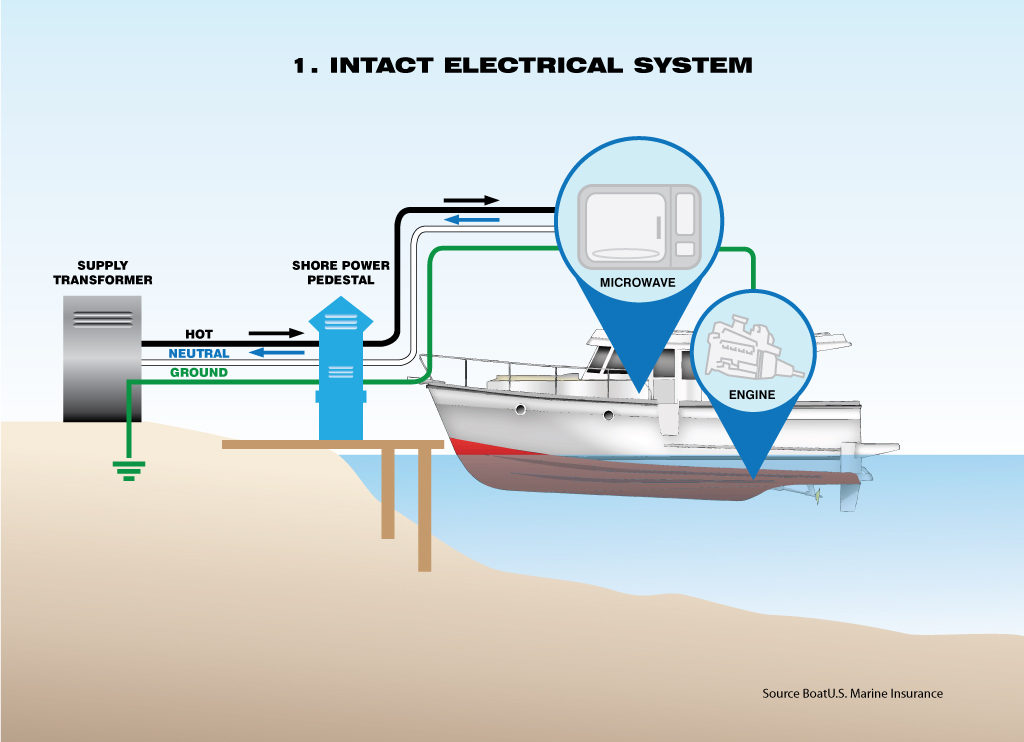
Properly Functioning Circuit
Images courtesy of Boat U.S. http://www.boatus.com/
Happens when a wire or appliance leaks power?
Electricity may “leak” from it’s intended path in these two wires to ground. This condition is called a ground fault. A good example of this is an insulation failure in the wiring of an appliance. Notice the microwave (or any appliance using A.C. power) with the ground fault. This condition will result in a mild electric current in the water which will potentially paralyze a person in the water.
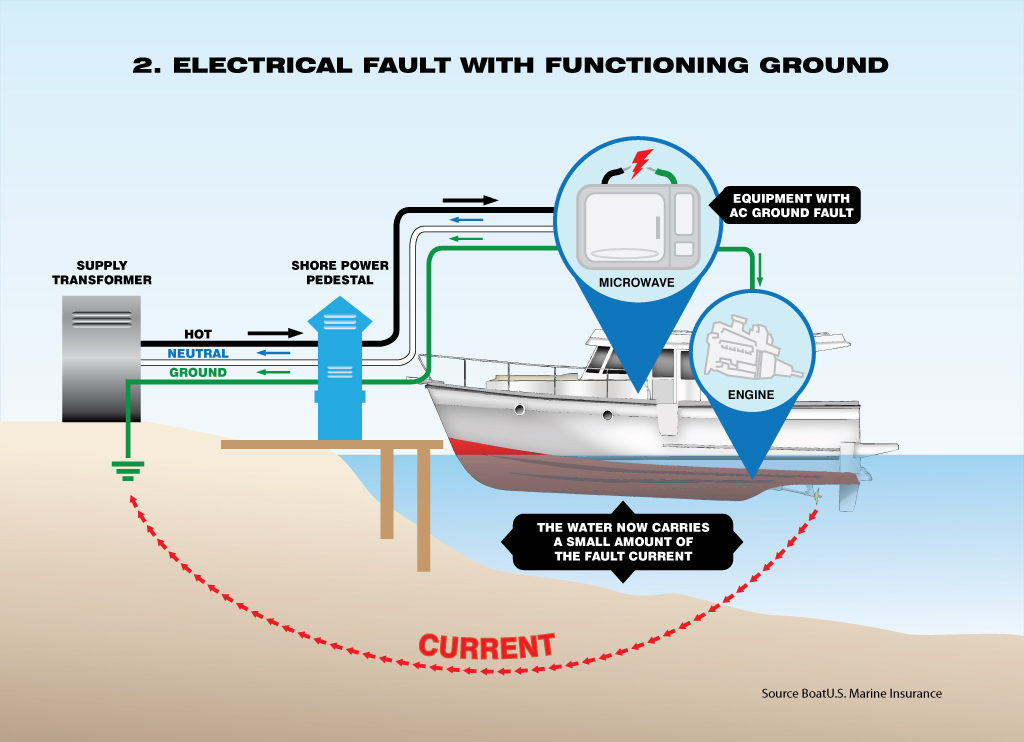
Electrical Fault with Functioning Ground
What happens when there is a leak in the ground wire?
A faulty ground occurs when the grounding path breaks through a loose or broken wire. For instance, a shore power cord ground wire may fail due to constant motion and stress.
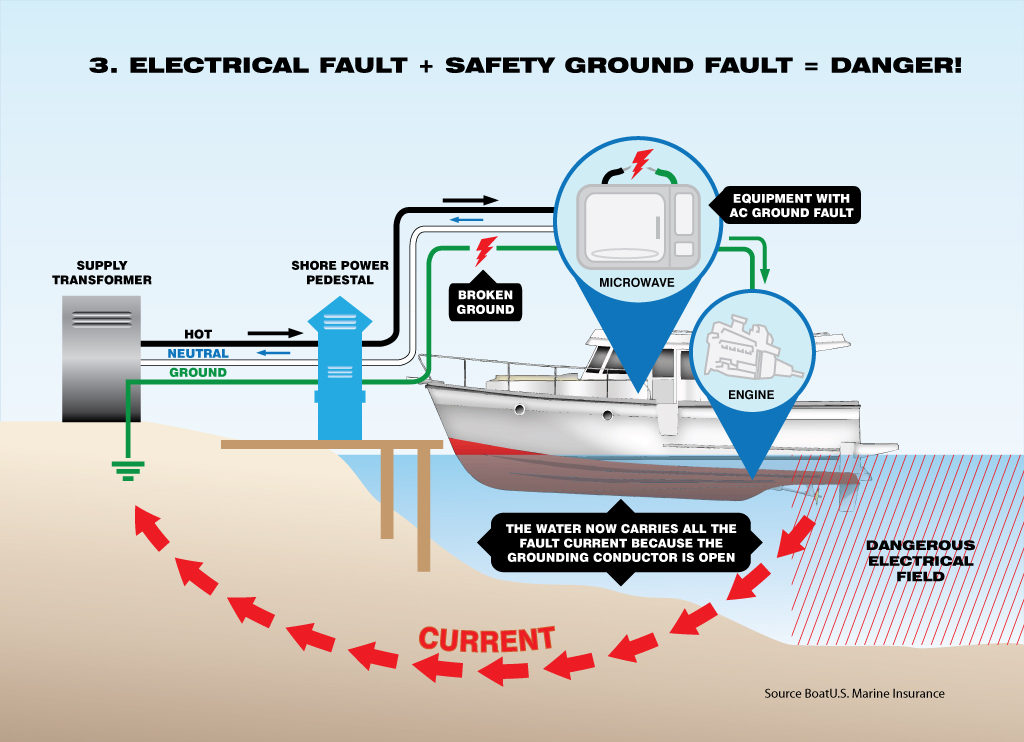
Electrical Fault + safety ground fault = Danger
When these two conditions occur at the same time, the results may be tragic. The combination of a ground fault and a faulty ground results in metal parts in the boat and under water becoming energized. People on board the boat are likely to receive a shock from touching energized metal parts.
When this happens, a person swimming near the boat will be electrocuted immediately.
A Coast Guard sponsored study showed numerous instances of electrical leakage causing drowning or potential drowning even though the shock did not result in death.
What can prevent this from happening?
ELCIs (Equipment Leakage Circuit Interrupters) and the more familiar GFCI (Ground Fault Circuit Interrupters) are part of a larger family of devices. These devices measure current flow in the hot and neutral wires. They immediately switch the electricity off when an imbalance of current flow is detected. ELCIs and GFCIs that are also Residual Current Circuit Breakers (RCBO) provide overcurrent tripping protection also.
GFCIs are used as branch circuit ground fault protection at the 5mA threshold in wet environments. GFCIs protect against flaws in devices plugged into them but offer no protection from the danger of a failing hard-wired appliance, such as a water heater or cooktop.
An ELCI provides additional whole-boat protection. Installed as required within 10′ of the shore power inlet, an ELCI provides 30mA ground fault protection for the entire AC shore power system beyond the ELCI. ABYC regulations still require the use of GFCIs in environments described above.
Thanks to Blue Sea Systems for the information in this article. For more on how to protect yourself and your loved ones from electrical shock drowning, go to the BoatU.S Electric Shock Drowning Resource Center.
Where is PWS?
PWS is located in the center of Door County at 7325 St Hwy 57. It is located 1 mile North of County MM (Hwy 42) and South of Sturgeon Bay. Look for the intersection of Idlewild Road.
Want us to address a dock or boat lift topic for you? Feel free to give us a call.
Call Jerry at 920-493-4404 or Email Jerry@wisconsinpws.com for more information.
Aug 28, 2018
ESD: What is it? Part 1 of 2
ESD, also known as Electric Shock Drowning, is a form of drowning caused by an electric current in the water. Where does the electric current originate? It could be your boat, a malfunctioning charger or lighting system. More on this in Part 2 of this series.
I have a fiberglass boat hull – that should protect swimmers – Right??
Yes, but you also have a motor with a metal prop in the water. As a result, this exposes people in the area of the boat to an electrical shock. The shock is greater as they get closer to the source of the problem.
Why is ESD even more dangerous in freshwater?
In freshwater, electrical current passes through the body paralyzing the body muscles. The strongest, most experienced swimmer in the world will not be able to swim through the current field if this happens.
Is there a warning of ESD?
Yes, there is:
- The victim will feel tingling, numbness, pain, and paralysis. That is the first sign of a problem. The closer they get to the source of the current the stronger the sensations will be – and the more paralyzed they will become.
- Initially, the victim will be able to shout, but if they unknowingly try to swim towards the electrical source, this ability will cease as they become paralyzed.

Still able to communicate
- The ability to “shout” more than once is critical. It is the difference between an ESD, an electrocution victim, and a drowning victim. An electrocution victim may not be able to shout at all. A drowning victim can only shout once or twice before his/her lungs fill with water.
- Typically, if the victim of ESD is not close to the source, he can shout and tell you what is happening. A drowning victim cannot yell as their lungs fill with water.
- Many times the ESD victim looks distressed and not as playful as usual. The muscles will no longer function as normal.
- The situation may turn into drowning once the victim begins to get water in their lungs.
How about Electrocution
- A possible victim will be able to scream, usually only once. The victim’s muscles will cease to function almost immediately.
- There will be a sudden cessation of all activity
- The victim usually rolls on their back with their face out of the water and is not responding if wearing flotation.
- If not wearing flotation, they will likely roll onto their face.

A swimmer in distress
Drowning
- The victim cannot speak or shout
• Reflexive “ladder climbing” with their arms even for an experienced swimmer.
• Looks “playful.”
• Lasts ~60 seconds with an adult and as little as 20 seconds with a child
• Slips below surface
What to do if you suspect an ESD situation
- Keep everyone out of the water – and if they are already in the water – DO NOT allow them to swim back to the dock unless the sensation gets stronger while swimming away from the dock or boat. Remember, the source may be a nearby dock, pump or boat.
- Try to get others in the area to swim away from your dock at least 100 yards and then go to the shore. The electrical current is stronger nearest the source and dissipates as you get away from it.
- Resist the natural impulse to jump into the water to help. You will become a victim yourself. Do NOT jump into the water. Use the Reach, Throw, Row, DON’T GO technique below.
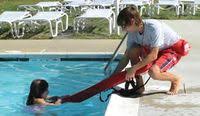
The safest way to help someone in distress
- Protect yourself by using an oar, a float or other non-conducting material to pull the swimmer to safety once the electrical source is shut off See the caption to the right.
- Immediately disconnect all power.
- Take the victim to the hospital to make sure there are no lingering effects that could be dangerous.
In General

Performing CPR if needed
- ESD victims are good candidates for successful Cardiopulmonary Resuscitation (CPR).
- Learn to perform CPR and maintain your training.
- To retrieve a person in the water, reach, throw, and row, but don’t go.
- Make sure your children understand the importance of not swimming anywhere there could be electricity. Don’t let them roughhouse on docks. Tell them what to do if they feel a tingling or shock in the water (see below).
I want to test for current myself. Can I do it?
Yes, with my digital voltmeter, put the negative lead to a ground, drop the positive lead into the water, if the needle moves, even slightly – you may have AC Voltage in the water. Having an electrician do the testing is the best way
- Have your boat tested once a year to see if it is leaking electricity, or buy a clamp meter and test it yourself. If you find any problems, have your boat inspected by a qualified electrician.
- Have a qualified ABYC electrician install an ELCI on your boat (refer them to the ABYC E-11 Standard) or use an ELCI in the shore power cord. As an alternative, install an isolation transformer on the boat.
- Test the GFCI/ELCI at least once a month or per the manufacturer’s specifications.
- DO NOT do your own 120-volt AC electrical work on a boat or hire an electrician who is not familiar with ABYC standards to do it. Many of the problems that lead to electrical faults result from the differences between shore and boat electrical systems and standards.
- NEVER dive from your boat to work on underwater fittings when it is plugged into shore power.
- DO NOT use common household extension cords for providing shore power to your boat. Use, and encourage other boaters to use shore power cords built to UL standards. Make sure the connections DO NOT touch the water.
If You Have A Private Dock
- NEVER swim within 100 yards of ANY dock using electrical power!
- If you have not electrified your dock or put an AC system on your boat, weigh the risks carefully before doing so.
- Need electricity on your dock – hire a licensed electrician and make sure the wiring meets the requirements in NFPA 303 and NEC 555. If your dock is already wired, hire an electrician to check that it was done properly. Docks are exposed to the elements, their electrical systems should be inspected at least once a year.
- If you normally run a power cord from your house or garage to charge your batteries, make sure the outlet has a GFCI and include an ELCI somewhere in the shore power cord. See part 2 of this series.
- NEVER swim off your dock without shutting down all shore power to the boat and the dock.
- Even if you adhere to all of these rules, nearby docks can still present a shock hazard. Educate your neighbors and work together with them to make the waterfront safe.
What if…
Someone you were with fell out of a boat without their life jacket – Would you know what to do?
- REACH: Hold on to the dock or your boat and reach your hand, a boat oar, a fishing pole, or whatever you have nearby, to the person. Many times these people have a fear of drowning and they will pull you under. Do not touch metal yourself.
- THROW: If you can’t reach far enough, toss things that float for the person to grab.
- ROW: If you’re in a boat, use the oars to move the boat closer to the person in the water, or call out to a nearby boat for help. Don’t use the boat’s motor close to a person in the water; they could be injured by the propeller
- DON’T GO: Don’t go into the water You will become a victim yourself. Call out for help. Never use a metal ladder or stairs to enter the water when there is an electrical problem
Be careful reaching from the boat or dock – If you are touching metal, you may be a path to ground yourself.
In part two of this series, we will explain more about the GFCI and ELCI.
Where is PWS?
PWS is located in the center of Door County at 7325 St Hwy 57. It is located 1 mile North of County MM (Hwy 42) and South of Sturgeon Bay. Look for the intersection of Idlewild Road.
Want us to address a dock or boat lift topic for you? Feel free to give us a call.
Call Jerry at 920-493-4404 or Email Jerry@wisconsinpws.com for more information.
Aug 21, 2018
Boat Carpet Care
Boat carpet takes a terrific beating every year. Extreme moisture, sand, stones, harsh UV rays, etc. If you’re reading this post you have a
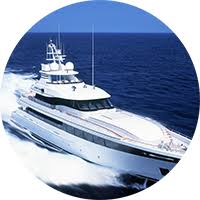
Big Boat
OR a
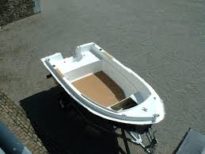
Small Boat
and you want to know how to keep the boat carpet clean. Keep on reading.
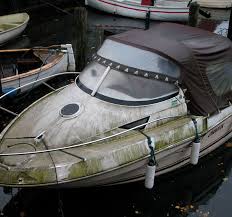
Is this your boat? Imagine what the carpet looks like.
Do’s and Don’ts for Boat Carpet Care
- Regularly vacuum and hose off your boat carpet to prevent staining.
- If there’s a spill, clean it up right away!
- Allow the carpet to dry thoroughly
Do NOT:
- Fold your carpet.
- Roll or store your carpet while wet. This will result in mold & mildew.
Boat Carpet Cleaning Tips
#1:
Start with the basics. Using plain vinegar and water is an ageless trick. Mix around 40 ounces of white vinegar to 1 gallon of water. Spray on the soiled area and let it soak until the area is saturated. Using a medium bristle brush, scrub the area gently. It’s important to thoroughly rinse the soiled spot and let it dry before using it again.
#2:

Boat Carpet cleaner
As an alternate use a commercial carpet product for cleaning your boat carpets. It’s best to use a non-foaming
product.
You can even use degreaser for those grease or oil stains as long as it does not have harsh solvents. Make sure to presoak and rinse the carpet thoroughly for the best results. Do not leave a residue as this traps dirt easier.
#3:
Fishermen (or women) will find fish blood to be a difficult stain to remove. However, it’s simple – use cold water and mild dish soap. Apply to the damaged area and let it soak in.
Do not use hot water because it will make the stain permanent. Blot with a towel or a clean sponge. Follow up with a soft-medium bristle brush and scrub after the first or second soaking. Again rinse the area thoroughly and repeat the process until clean.
One More Tip
#4:
Have a carpet that stinks? Baking soda works wonders for removing odors such as a wet dog or that fishy odor. A box of baking soda works great in a closet too.

Use Baking soda for a Boat Carpet Cleaner
Baking soda will also assist in eliminating some stains. Lightly mist the carpet first, then sprinkle a generous amount of baking soda over it. The longer you let it sit, the more it will absorb. Allow 3 hours minimum – and it can be left overnight. Be patient, after it’s done its job – merely vacuum it up.
Hint: place a layer of “PRESS N SEAL” over the baking soda to keep the moisture in – it works better that way.
Follow these simple carpet cleaning tips, and your boat carpet will stay fresh and clean for years to come.
Don’t forget to clean it at the end of the boating season.
Where is PWS?
PWS is located in the center of Door County at 7325 St Hwy 57. It is located 1 mile North of County MM (Hwy 42) and South of Sturgeon Bay. Look for the intersection of Idlewild Road.
Want us to address a dock or boat lift topic for you? Feel free to give us a call.
Call Jerry at 920-493-4404 or Email Jerry@wisconsinpws.com for more information.
Jul 17, 2018
Nothing lasts forever – including boat lift cables
Boat Lift cable problems require a thorough explanation.
There are two types of normal cable wear:
- Internal cable abrasion- This occurs whenever strands work against each other under load.
- External abrasion – This will occur when the cable bends around the winch drum and rubs against the adjoining cable wrap. It also occurs when the cable rubs against the side of the winch drum
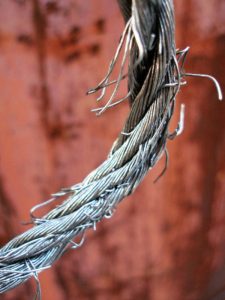
Frayed Boat Lift Cable
Types of Steel used as a Boat Lift Cable
Galvanized Steel: Galvanized steel is carbon steel made corrosion resistant by the application of a thin layer of zinc oxide. A “hot dip” in a molten zinc bath results in galvanizing the cable. The process applies a thin layer or coating of zinc to the steel to increase the metal’s resistance to corrosion.
Galvanized steel is less expensive than stainless steel due to the differences in the processing of each. Galvanized steel is stronger than stainless steel. The downside to galvanized steel is the fact that it has a higher electron-potential than stainless steel, making its’ corrosion resistance less effective because it does NOT regenerate when damaged.
Stainless Steel: Stainless steel is carbon steel which is mixed with about 10% chromium to resist oxidation or corrosion. The chromium forms a chromium oxide layer that promotes resistance to corrosion. When exposed to oxygen the protective coating WILL regenerate. The anti-corrosion of the chromium merely needs oxygen to maintain this property of resistance.
All Lift Cables Will Require some Maintenance
The winch and lift cables require periodic attention. Remember, these (2) items do all the “work” on your lift. They do the lifting of the rack assembly with the weight of the entire boat and motor on it.
Boat lift cables are manufactured out of either stainless or galvanized steel.
Galvanized cable is used as the winch cable on heavy boats. Stainless steel cables are used for the remaining cables on top brands like ShoreMaster.
Both types of steel offer the benefit of corrosion resistance and strength. However, watch for the noteworthy differences mentioned above that require your attention.
Corrosion
Galvanized cables that break usually show signs of corrosion or rust in advance. Typically, the failure is located near the winch when the rack is in a lowered position. Another common site for corrosion is at the bottom of the cable where it secures to the frame on some brands.
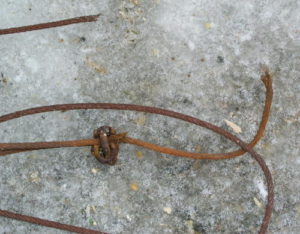
Rusted Boat Lift Cable
A slight discoloration indicates that the protective galvanizing coating may have worn away. Heavy concentrations of rust indicate that the steel cable is losing strength and requires replacement immediately.
How long should a cable last?
Experts claim galvanized cables require replacement every two years. All things being equal, a stainless cable will last up to twice as long.
A point often overlooked – internal abrasion or rust is hidden and may not show external damage on the cable during a visual inspection. A boat lift cable like this may sometimes fail without prior warning.
Other causes of cable failure
An improperly positioned boat puts extra strain on any boat lift cable. Wave action pounding against the boat hull or jamming the rack against the frame may send your boat into the water with a corroded or damaged cable. Even a new cable may “snap” if you jam the rack against the frame.
When in doubt, replace the cable; trying to squeeze another year out of a $95 cable that you know s damaged or rusting isn’t worth the risk.
In Conclusion… What Can You Do For Your Boat Lift Cable?
- In spring and fall put a short blast or two of PENETRATING OIL on the cables. Spray the cables wrapped around the winch drum from the top of the winch. Do not soak the cable; you’ll only contaminate the water. Use only penetrating oil. A quick spray during the summer is very helpful.
- NEVER USE GREASE to lubricate the cables. (grease traps the moisture inside the cable accelerating its deterioration).
- Inspect cables for frays and rust – Caution – wear leather gloves to prevent injury to your hands. Check near the top of the winch cable as this is the most common area for frays. Replace as needed.
- Check all cables to assure correct alignment on the rack pulleys.
- With your boat correctly positioned on the lift, check for any slack in the cables. All cables should be equal in tension. Contact PWS for adjustment, if needed.
- Look for cable corrosion near the winch with the rack all the way down. Maintain weight on the rack to assure proper tension on the cables.
We hope that this article will make your life easier and lend more confidence to your selections. Your boat lift is an investment, and as such we want to help you make wise decisions.
Reminder
PWS is located in the center of Door County at 7325 St Hwy 57. It is located 1 mile North of County MM (Hwy 42) and South of Sturgeon Bay. Look for the intersection of Idlewild Road.
Want us to address a dock or boat lift topic for you? Feel free to give us a call.
Call Jerry at 920-493-4404 or Email Jerry@wisconsinpws.com for more information.
Jul 10, 2018
When does a Lift Cable need Replacement?
Lift Cable replacement depends on a variety of conditions:
- Was the lift adequately sized for the boat?
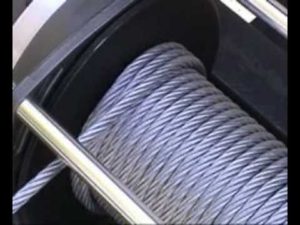
Properly wound Boat lift cable
- Did you change boats since you originally bought the lift?
- Is there visual damage to the cable?
- How well is the lift cable maintained?
- How often has it been lubricated?
- What lubricant is used?
- Is the cable winding correctly on the winch drum?
- Are the cables frayed?
- Is there corrosion on the cable?
When & How Do I Inspect a Lift Cable?
The best time to inspect the cables is when it is on dry land. That way you can check all of the critical points. Ideally, the lifting rack is in the lowered position, so more cable is exposed at the winch. Try not to let the cables go slack by lowering the rack too far.
If you inspect the lift while it’s in the water, raise the lift rack out of the water to do the inspection. A complete inspection at the bottom of the lift cable should be done when the lift is on the shore again.
In both cases, examine all exposed cables for frayed or rusted wires. Pay particular attention to the cable coming from the winch.
What does a frayed boat lift cable look like?

Frayed Boat Lift Cable
Look for frayed or rusted areas on the cable. The greater the number of frayed wires the greater the risk of failure.
Excessive rust on the cable means there could be major rust inside. Rust indicates a major weakening of the cable
and should be monitored carefully.
CAUTION – Always wear leather gloves when sliding your hands on these cables. The leather will protect your hands from a frayed wire which can be a painful experience for unprotected hands. Cloth gloves will not protect you.
The Next Thing to Inspect
What type of pulley material is used on the lift rack? To cut costs, some manufacturers still use a hard, black plastic pulley. These require extra attention. DO NOT lubricate any of these pulleys. Doing so will only contaminate the water.
If you have the black plastic pulleys (or any plastic pulley for that matter) follow these instructions:
With the rack above the water look inside the exposed ends of the rack tubes:
- Are the sides of the pulleys broken or bent over? (Common with plastic pullies)
- Are the cables still riding on the pulleys?
To completely check the pulleys, you should have someone raise the rack so you can see the entire pulley as it turns. The pulley sides could be damaged, and you can only see a portion of it from the ends of the tubes. Do this at all four corners.
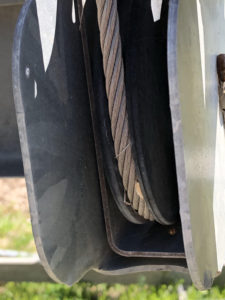
A plastic pulley on a boat lift Cable
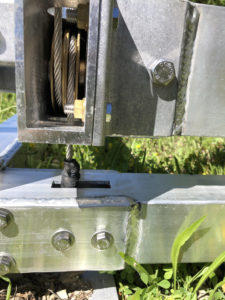
Brass pullies on a Boat Lift Cable
DO NOT place your fingers inside the tube to inspect it when it is moving. You may lose your finger.
Why are Plastic Pulleys inferior?
A lift cable will easily slip off a cracked or broken plastic pulley. With the lift cable off the pulley, the load on the cable is more than double the usual tension. It also results in broken internal wire strands due to the reduced diameter of the new bearing surface.
In this situation, the pulley needs to be replaced immediately. The heavier the boat, the more important this is.
FYI in the case of the brass pulleys used on a ShoreMaster lift, we have never seen a broken or chipped pulley. Note: Only the original vertical jet ski lifts from ShoreMaster had plastic pulleys. ShoreMaster corrected this problem almost immediately and only use brass pulleys on all their lifts today.
One Final Thing to Look For
If you have a sandy beach, look for sand inside the tubes. If sand is built up inside the rack tubes, remove it as soon as possible by flushing the tube out. A sand packed tube can happen after a storm when:
- The water was heavily agitated on a sandy beach; and
- While the rack is in a lowered position.
Sand can pack so tight in the tube that the cable can not move through it. The same is true of seaweed that gets into the tubes.
In Part 2 of this 2 part series, we discuss the types of cables used on lifts today. We will also address the life expectancy of cables.
SEE also – When Should a Lift Cable Be Replaced? PART 2 of 2 – UPDATED
Reminder
PWS is located in the center of Door County at 7325 St Hwy 57. It is located 1 mile North of County MM (Hwy 42) and South of Sturgeon Bay. Look for the intersection of Idlewild Road.
Want us to address a dock or boat lift topic for you? Feel free to give us a call.
Call Jerry at 920-493-4404 or Email Jerry@wisconsinpws.com for more information.


