Leveling Legs for Boat LIfts (Adjustable) – Pier & Waterfront Solutions

Boat Lift Adjustable Leveling legs – What you Really need to know

Written by Shoremaster marketing                                                 Updated by Pier & Waterfront Solutions LLC

Adjustable boat lift leveling legs – You may not need them.

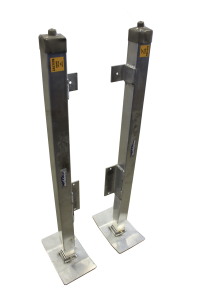
image of Boat Lift Leveling Legs by ShoreMaster

Boat Lift Leveling Legs by ShoreMaster

That’s right – You may not need adjustable boat lift legs.  Unless your water depth continuously fluctuates throughout the boating season you may not need leveling legs for your boat lift. Wouldn’t it be a shame to pay for that feature when it isn’t needed?

Some boat lift manufacturers automatically incorporate adjustable leveling legs into their boat lift design. This forces customers to pay for them, even when they don’t have a need for them.  Why?

It’s their attempt at differentiating their design from the simplicity of a ShoreMaster Boat Lift.

Remember – Simple is always better.

By incorporating adjustable leveling legs in the design, they are also adding to the owners’ maintenance burden.  All that for an accessory that may not be required or even wanted by the consumer.

Still feel it is a desirable accessory?

For those that feel it is a desirable accessory, ShoreMaster does offer add-on adjustable leveling legs for boat lifts.  However, ShoreMaster boat lift customers aren’t initially required to pay for or maintain an accessory that they may not need.

You may not need them as much as you think you will.

Even if you experience moderate water depth fluctuations, you will likely find that you don’t need adjustable leveling legs.

Here’s an example: even if you experience a drop in a water depth of 12 to 18” over the summer, you may be able to adjust for this.  Changing where you position your rack beam may solve the problem for you.

In other words – Your your starting water depth is near 4’.  You will likely be able to overcome an in-season water drop of about 12”.  Just lower your boat lifts rack an additional 12” to allow access to your boat lift. If you have a shallow lake, you may have the lift positioned with the rack as low as it goes right from the start.  No further adjustment is allowed.

What good will the lift leg system do if you can’t go any further down? It’s that simple. There may be no need, or ability, to adjust the overall height of your boat lift at all.

In reality, you usually will not need to adjust your lift legs after your initial install. Why pay for something that requires more maintenance over the years?

ShoreMaster’s adjustable leveling legs are an add-on feature for new or existing boat lifts. That’s a win for current and future boat lift customers.

Adjustable boat lift legs are not as adjustable as you might think.

Adjustable Leveling Legs do provide a convenience that works well for an only a few boat lift owners

It is important to make sure that the amount of vertical travel is adequate for their water fluctuation.  After all, built in lift leveling legs will do you no good if they don’t provide an adequate amount of travel.

The Case for All Add-On Boat Lift Accessories

It’s pretty difficult to improve on the time-tested design of a ShoreMaster vertical DVS boat lift.  That’s because a boat lift’s design should be:

  • simple,
  • durable, and
  • should not require constant maintenance or tightening of bolts.

Shoremasters welded frame design and simple pulley system, making it extremely simple and durable. Normal maintenance usually consists of replacing a cable every few years as needed.

ShoreMaster has a record for years of dependable service with minimal maintenance.

When you incorporate adjustable leveling legs into the design of a boat lift, you reduce the simplicity of the lift and increase the maintenance requirements.

Along with this reduction in boat lift simplicity comes:

  • increased potential for problems,
  • more need for maintenance,
  • added weight; and
  • higher cost.


Unless the innovation is something that benefits all customers, you are forcing them to pay for things they will never use. With ShoreMaster’s Adjustable Boat Lift Screw Legs as an add-on feature, you can always put a leg leveling system on if you need it

You’re not wasting your time and money maintaining an accessory that you didn’t require in the first place.

 Reminder

Pier & Waterfront Solutions specializes in ShoreMaster docks, lifts, and accessories – both residential and commercial.   We service the rest.

PWS is located in the center of Door County at 7325 St Hwy 57.  Located 1 mile North of County MM (Hwy 42) and 3 miles South of Sturgeon Bay at the intersection of Idlewild Road, our staff is ready to serve your needs.

If you have a dock or boat lift topic or issue you would like to see addressed on our site, feel free to give us a call.  We believe that an informed consumer makes better decisions.

Call Jerry at 920-493-4404 or Email Jerry@wisconsinpws.com for more information.  

When Should a Boat Lift Cable Be Replaced?

When Should  A Boat Lift Cable Be Replaced?

The proper time to replace a boat lift cable depends on a variety of circumstances:

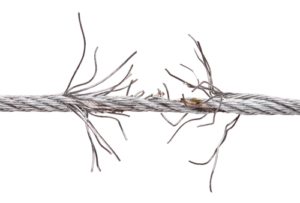
image of corroded cable

Corroded & Frayed Cable

  1. How well is it maintained?
  2. How often is it lubricated?
  3. What is used to lubricate the cables?
  4. Is the cable winding properly?
  5. Was the lift sized properly?
  6. Is there any visual damage to the cable?
  7. Are there frayed wires on the cable?
  8. Is it a galvanized cable or stainless steel?
  9. Is there corrosion on the cable?


What is the proper lift cable maintenance?      

Lift cable replacement depends on a visual inspection of the lift cables to help determine when to replace them.   It’s best to inspect it while it is on dry land in order to check all of the key points.   Ideally, the lifting platform (or rack) should be in the lowered position.  Of course, make sure the lift cable is not allowed to go slack.

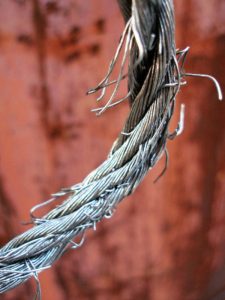
image of frayed lift cable

Frayed Lift Cable

Examine the vertical length of the cable for frayed wires especially near the winch.  CAUTION – Always wear leather gloves when sliding your hands on the cable.  To put it differently, a frayed wire  can cause extensive, painful damage to unprotected  hands.

The cable is made up of multiple strands of wire and multiple wraps are used to form the overall cable.  Excessive fraying or corrosion near the winch is a  top signal of damage.


Nothing lasts forever – even boat lift cables

There are two types of cable wear:

  1. Internal cable abrasion- This occurs whenever strands work against each other under load.
  2. External abrasion – This also occurs when the cable bends around the winch drum and rubs against the adjoining cable or drum.

How long a lift cable lasts depends on:

  • How often it’s used;
  • What type of cable it is; and
  • The care it receives.

Every time a boat is raised or lowered over a winch drum there is internal wear on the cable.  Each strand of wire in the winding is moving at a slightly        different speed.  Abrasion of the cable strands is the result.  When you loose too many strands you lose a lot of strength.

What should be done?

Steel lift cables require a squirt or two of penetrating oil occasionally to reduce the internal friction on the strands and individual wires in the cable.  This      is particularly important on galvanized cables.  Lubrication helps to preserve the galvanized coating and minimizes abrasion between strands.  Grease        should NEVER be used, as it traps moisture inside the strands.  Do not saturate the cable and only use penetrating oil for best results.

Stainless steel lift cable will also benefit from a few squirts of penetrating oil. This should be done in Spring and again in Fall.

Strong indicators that a boat lift cable needs to be replaced:

  • Excessive broken strands:
  • Kinks:
  • Deformities and
  • Areas of heavy corrosion.

Corrosion

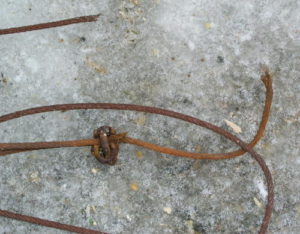
image of Rusted Lift Cable

Rusted Lift Cable

   Galvanized cables that break tend to show signs of corrosion or rust.  Usually this is located near        the winch when the rack is in the lowered position.  It also can be at the bottom of the cable where      it is secured to the frame. Note: do not allow the main cable to go “slack” when lowering the rack.

    A slight discoloration indicates that the protective galvanizing coating has been worn away.                  Concentrations of heavy rust indicate that the steel cable itself has lost considerable strength and        should be replaced immediately.

Assuming the cable is well cared for, how long should it last?

Experts say that, to be safe, galvanized cable should be replaced every two years.   All things being equal, stainless cable will last longer, up to  twice as long.

A point often overlooked – internal abrasion or rust can be hidden and may not show visible damage on the cable.   A boat lift cable like this may sometimes fail without prior warning.   An improperly  positioned boat, shocks from wave action (when bouncing on the lift rack or jamming the rack against the frame may send your boat into the water.  

When in doubt, replace the cable; trying to squeeze another year out of a $75 cable isn’t worth the risk of dropping your boat or personal injury.

 Remember

Pier & Waterfront Solutions (PWS) specializes in all ShoreMaster docks, lifts and accessories.

Located in the center of Door County at 7325 St Hwy 57, just south of Sturgeon Bay at the intersection of Idlewild Road.  Our staff looks forward to serving all of your waterfront needs.

Found this article helpful?  Go to “NEWS” on any page of our website for a complete list of articles meant to keep you informed on the latest product information and maintenance issues. Check out our “older entries” also.

The wide variety of articles on dock and boat lifts issues will answer many of your questions.   PWS believes that an informed consumer makes better decisions.
Call Jerry at 920-493-4404 or Email Jerry@wisconsinpws.com for more information.  

Coming Soon – “The PWS Store” on our website


Plastic decking – How do I maintain it?

Plastic Decking  is a Major Investment

The plastic decking on a dock is a major portion of the dock investment.  It does take time and effort to maintain it properly.  This is particularly important on marine structures vulnerable to the elements.  Most plastic decking requires yearly maintenance to appear attractive for years to come.

Why does my decking appear to be dirty and what causes it?

Mold/mildew is the common term used to describe a growth on the surface of matter.  It’s caused by fungi, especially in the presence of dampness.  Under a microscope, mold has an octopus-like structure.  Its legs attach to a surface in a web-like manner.  Once a mold has successfully colonized, it releases thousands of new spores. This growth makes your deck appear dirty over and over again, making your deck appear dirty.

What makes the mold grow?

Molds need three things to grow:

  1. Food,
  2. Moisture and
  3. Temperate weather.

When the spores are in a favorable environment, they will germinate.  The spores settle out of the air or are deposited by rainwater and wet feet.  As a result, they will be more prevalent on horizontal surfaces (like your decking panels).  The colonies do not migrate, but rather establish colonies and release even more spores.

Plastic decking is inorganic but nature deposits “food” and moisture in the form of rainwater. Birds deposit further nutrients and you carry moisture, suntan lotions and dirt from the environment and deposit it on the decking.

While plastic surfaces appear sleek and impermeable, plastic docks still cannot escape the mold/mildew cycle.  Docks still need to be cleaned with regularity.  This is particularly true with HDPE plastic decking (usually recycled, solid plastic boards.)

Without damaging the environment, how can I clean the mold and common dirt off of my plastic decking?  

We all know that we must avoid introducing pollutants, including soaps and most other commercially available cleaning products into our waterways. Still, you do have some options.

Cleaning methods for Plastics

Note – In all cases mentioned here the use of safety gloves, face masks and eye protection is highly recommended.

Use a natural biodegradable cleaning solution that removes buildup without damaging the decking material or the environment.

Among your choices are:

  • Use a Pressure washer;  or
  • Hand scrub the decking with a commercially available bio-degradable cleaner like “OxiClean”
  • NEVER use chlorine bleach

Pressure washers require patience and care

The use of a pressure washer must be done carefully even though there is no “grain” involved in the decking.  Too much pressure when spraying can cause physical damage to the decking material.

Never allow the pressure head to get closer than 12 inches to the surface.  Use a “fan” nozzle with a 20 degree tip to reduce the pressure.  Never use more than 1800# of pressure.  The less pressure at the sprayer head, generally the closer you can get to the surface.

Hand scrubbing

Using a hand brush with natural or plastic bristles and a commercially available product like “OxiClean” is a safer way to wash the decking.  “OxiClean” breaks down to oxygen, water and soda ash so it won’t harm the environment.  OxiClean uses oxygen ions to neutralize stains and dirt.

Many scrub brushes allow you to use a pole handle so you do not have to kneel down and it will be more comfortable for you.  Do not press so hard that the bristle bend to the side as the real cleaning takes place at the ends of the bristles.  If there is a wood like pattern in the decking surface try to follow that direction.  This allows you to get deeper into the grooves with less effort.

Get into the deck spacing as far as possible to make the decking look even better.  Before the decking dries, rinse the decking with clear water.

If the product you choose has oxalic acid (very corrosive) or chlorine bleach we strongly recommend that you do not use it because it is not bio-degradable.  It could also get you a major fine from the DNR.

As an extra caution check the label of any product you plan to use to see if it contains harmful ingredients like hypochlorite bleach.  ALWAYS use the smallest concentration to do the job while observing safety protocols.

Found this article helpful?  Call Jerry at 920-493-4404 or Email Jerry@wisconsinpws.com for more information.  Also go to “NEWS” on any page of our website for a complete list of articles meant to keep you informed on the latest product information and maintenance issues.