WHICH DOCK CONFIGURATION SHOULD I CHOOSE? Part 3
WHICH DOCK CONFIGURATION SHOULD I CHOOSE?
The dock configuration is the next thing to consider when figuring your total dock cost. Your decision should be made after reading part one of this series (What does a Dock cost?). After reading that, you probably have an idea of the frame style you would like to use.
Next, you should read part 2 – What type of decking is available? Select the decking that caught your eye. Part three discusses the dock configurations you may want to use. We also include some of the accessories you’ll want to consider.
Let’s start the process
So you’ve measured water depths, surveyed the neighbor’s dock, and determined how far out you need to go. Maybe not! Don’t want to walk in the cold springtime water? Remember, we confirm the water depth for you as part of our site surveys.
At this point, you may be looking at a straight dock – (boring)!
What you add from here on transforms your dock from a strictly functional piece of equipment to a relaxing area, and so much more. The configuration you choose in the end should reflect the way you want to use the dock.
Everyone has different ways to use their dock. Some people want to be able to fish off the end of the pier. Maybe even have a bench or seating available. Others want access to their boat. Still, others will use their dock as a primary entertaining and relaxing area. These are all great reasons.
ShoreMaster docks are versatile so you can change your dock layout from season-to-season. Remember, the Infinity dock system allows you to do this easily. See also-https://wisconsinpws.com/infinity-track-system/
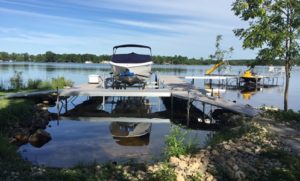
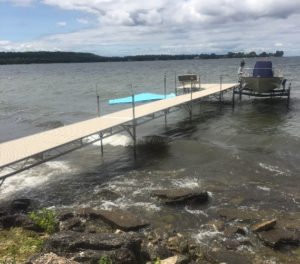
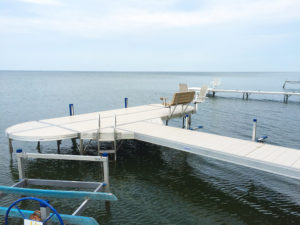
We have included configurations as well as actual photos of our docks in the photo array below. Get started on the layout that fits your needs. Then give Pier & Waterfront Solutions a call.
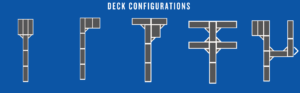
Common Dock Configurations
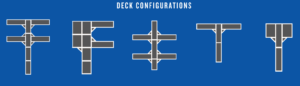
More Configurations
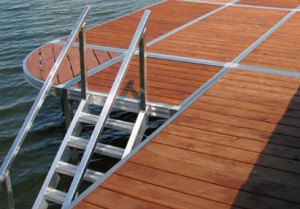
RS4 dock with Dock Steps
ShoreMaster Dock Configuration
Dock Configurations 2

Dock Configuration 3
Dock Configuration 4
OR
Design your dock configuration on the ShoreMaster Website
ShoreMaster has a simple dock-builder available online. Its very simple to use. (drag and drop) It handles MOST configurations. Are you having difficulty? We can do it for you. In most cases, we give you a rendition (sometimes hand-drawn), so you can be sure the layout is what you envisioned.
What will I be able to do on a dock?
Fishing – Consider an extra-wide dock section at the end to give you more room to cast and lay out your fishing equipment. Install a bench for more comfort.
Docks are an excellent place for kids to learn from Grandpa. They can relax on the dock and exchange fishing stories and learn a little bit about life.
Try to extend the dock far enough into the water, so you’re next to a weed bed. A dock helps lure fish. Fish like to congregate and seek out cover and protection.
Sports – How about Kayak or paddleboard racks? Why keep carrying your equipment up to the house? Keep it handy and ready for use.
Entertaining – If you regularly party on your dock, you’ll want a dock that is wide enough to accommodate your guests. It must offer plenty of space for moving around. For extra space around a serving table or a bench, consider an additional 4-foot wide dock section. We can add it on to the standard 4-foot wide sections. Consider an inside corner section. It’s great for adding space – and peace of mind. A 90-degree corner can seem precarious.
For more pizazz, ShoreMaster offers a curved design on their truss and rail dock systems. Consider adding a curve to your dock. Go around obstacles like trees and rocks and make a unique dock at the same time. It definitely won’t look like your neighbors.
A rounded dock near the end, at the shoreline or even at the midpoint adds a unique design that only you have. The style is distinctly yours.
Patios
Ninety- five percent of the time the dock layout will include a “patio” area. The patio area requires a section of dock placed parallel or perpendicular to the main dock. Adding one patio dock essentially creates an 8 ft x 8 ft activity area over the water.
What if you add another patio area to the side to make a 12 ft wide x 8 ft long area? This additional “patio” section could be placed alongside the first section OR on the opposite side of the dock. The layout also helps protect your dock in a storm by making it broader and more stable. However, the REAL advantage of these layouts is that you have more working or entertaining area available.
Put a bench or patio set on the patio area to stay dry. Use it to get away from people entering or exiting the water – if they let you.
By the way, who said the patio section of a dock has to be at the far end of the pier? Would it be more functional at the midpoint or even at the shore end?
Watercraft Access:
- Do you launch a boat or jet skis? These functions may need different layouts depending on the depth of water and the draft of your boat or jet ski. They reflect what the owner needs for launching and storing the watercraft.
- A typical layout would likely be the finger dock. The finger dock consists of lengths of pier placed perpendicular to the side of the main dock. The arrangement creates a place for your jet skis or boat.
- The use of a “T,” or “Y” shape can add a distinctive look to your dock. After all, your pier is the focal point of your shoreline. Every visitor will want to go out on your dock.
What accessories will you need for your dock configuration?
- Seating– In the form of furniture sets, chairs or benches.
- Utilities– Water and electricity run under the dock frame.
- Lighting– A.C. power is available, but the preferred method is solar powered lighting. They are typically placed in recessed “dots” in the decking.
- Ladders– On the bay of Green Bay most docks are set high out of the water to protect them from waves. A pivoting ladder will get you out of, or into, the water safely.
- Railing- A railing makes it safe for people having difficulty getting around or those who are unsteady on their feet to access your dock.
- Storage boxes– Skiers, kayakers and paddleboard enthusiasts may want to invest in a dock box to store their equipment. (life jackets, paddles, and beach towels). The storage boxes come in many shapes and sizes – (square, rectangular and triangular to name a few).
To summarize this series – What does a dock cost? It depends!
Missed a part of this series?
Publication dates:
Part 1 – What does a Dock cost?
2 – What type of decking is available?
3 – Which dock configuration should I choose?
Need Help Planning a Dock Configuration For Your Home or Cottage?
Contact Pier & Waterfront Solutions TODAY!
Do you have a friend that may be interested in this information? Please share a link to this page with them.
PWS is located at 7325 St. Hwy 57. That’s 1 mile North of County MM (Hwy 42) and 3 miles South of Sturgeon Bay at the Idlewild Road intersection.
Our staff is here year-round to assist you.